Download twrp 3.6.0 Root Ulefone Armor 8 Pro:
unofficial build of twrp 3.6.0 have Now been available for the Ulefone Armor 8 Pro, user Who own Ulefone Armor 8 Pro can Root it by following the below Instructions. to Install twrp Recovery on Ulefone Armor 8 Pro First You need to unlock it’s bootloader after that You can Root it by flashing magisk 23.0.zip.
Ulefone Armor 8 Pro Run on Mediatek MT6771 SoC along with Android 10 6GB of RAM and 128GB of storage. The device come with 6.1 Inch IPS display With the Resolution of 720 X 1560 Pixels.
Contact Me for safe Installation, No brick risk
Disclaimer:
- Rooting May Void Your device warranty
- Make a backup & Move it to Safe Place Like Pen drive or PC.
- Make sure Your Phone at-least 50% charge to Prevent accidental shut down during the Rooting Process.
Download Files:
- Vbmeta.img
- Magisk 23.0.zip
- No verity opt encrypt zip
- twrp 3.6.0 for Armor 8 Pro
- Platform tools/adb Fastboot tools
Note:
- to make Magisk flashable Rename Magisk-V23.0.apk to Magisk-v23.0.zip
How to Install twrp Recovery on Ulefone Armor 8 Pro:
- Enable developer options, for that Go to Setting>About phone>tap 5-6 times on software version>done. Now Go back /additional settings/ developer options & USB debugging > Turn ON, OEM unlocking > Turn ON.
- Download & Install latest adb fastboot driver on your computer
- Download & setup platform tools on your computer.
- extract Downloaded recovery.img & vbmeta.img in platform tool folder
- switch off Phone, press power & volume down key, once you see fastboot logo connect it to computer by using the usb cable:
- Open command window in Platform tool folder
- send below code
fastboot flashing unlock
- on phone confirm unlock warning by pressing volume up key
- disable AVB by sending below code
fastboot erase userdata
fastboot flash vbmeta vbmeta.img
- Send twrp by using below code
fastboot boot recovery.img
Your Phone booted to twrp, Flash magisk 23.0.zip & No verity opt encrypt.zip
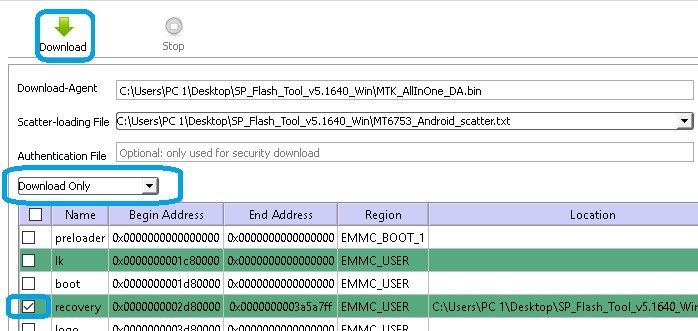
Install using SP Flash tool:
- Download and Extract SP Flash tools on PC
- Install Mediatek V-COM Driver on PC
- Download & Extract twrp image with Scatter
- Run SP Flash tools From Main Screen Select Scatter File Navigate Scatter.txt File form the twrp Folder and again same Navigate and Select DA File
- From the Partition List Select Recovery Partition only. and then Double Click on it Select twrp recovery.img File
- Click Download and Connect Your Switched off Phone.

once done, don’t bootup Phone, directly Go to Recovery (by holding Volume+ & Power Key) & Flash Magisk 23.0.zip & No verity opt encrypt.zip
Note: if you will face a brick, make a patched boot.img using magisk, write it using mtk client, Now you have rooted phone write twrp using flashify app under recovery partition.
How to Root Ulefone Armor 8 Pro:
- Download & Move Magisk 23.0.zip, No_verity_opt_encrypt.zip to device storage
- Reboot Phone to twrp recovery by Pressing volume up and Power button
- Make a Nandroid backup
- wipe userdata
- Flash Magisk 23.0.zip and No_verity _opt_encrypt.ZIP
- Reboot system now


